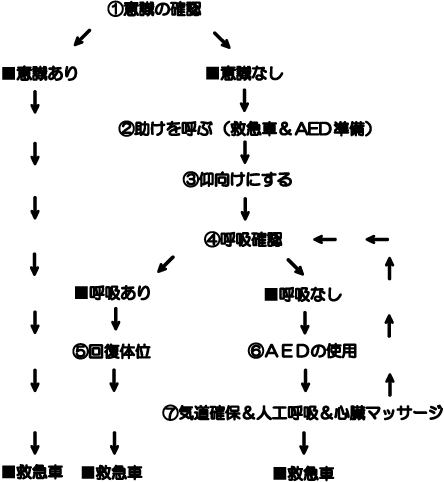
■Basic life support procedure
Learn the basic life support procedure.
Use an AED if the person is not breathing. |
|
①Check for responsiveness
At the person’s ear, call out loudly, “Are you okay?”
If the person responds, listen to their needs and provide first aid.
Even if the person is responsive, call an ambulance if necessary.
|
②Call for help (ambulance & AED preparation)
If the person is unresponsive, call out for help.
Ask bystanders to call an ambulance and bring an AED.
If no one is nearby, call an ambulance yourself. If an AED is available, go and get it.
|
③Lay the person on their back
Place one hand behind the person’s head to help protect the neck, and place your other hand on the shoulder as you gently roll the person onto their back.
If the person’s wetsuit interferes with basic life support, remove it or cut it with scissors.
|
|
④Check for breathing
Look for chest and upper abdominal movement. If the person is not breathing, use an AED.
|
⑤Recovery position
If the person is breathing but unresponsive, wait for the paramedics in the recovery position so the airway remains open.
Roll the person onto their side (left or right). Tilt the head slightly to maintain the airway. Bend both elbows and place the back of the upper hand under the head.
Bend the upper knee to about 90 degrees to help prevent the body from rolling forward or backward.
Turn the mouth toward the ground so vomit can drain naturally.
A diver brought out of the water may be cold. Keep the person warm using a blanket or rescue sheet.
|
|
⑥Use of AED
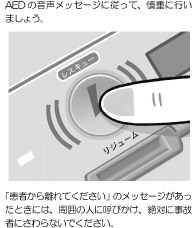
If you determine the person is not breathing, use the AED immediately and follow the AED voice prompts.
If you cannot use an AED immediately, follow procedure ⑦ “Airway Open & Breathing & Circulation.”
|
|
1 Turn on the AED.
(Some models turn on automatically when the cover is opened.)
2 Take out the electrode pads.
|
|
|
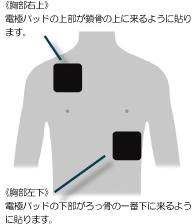
3 Remove clothing and attach the electrode pads to the person’s chest.
After attaching the pads, do not touch the person.
Keep other people away from the person.
If the person is wet (for example, right after removing a wetsuit), wipe off the water thoroughly.
Remove items that may contact the body, such as accessories.
|
|
|
4 The AED begins analyzing the electrocardiogram (ECG).
5 If defibrillation is required, a voice message will play and charging will start automatically.
The button flashes when charging is complete.
6 Make sure everyone is clear of the patient, then press the flashing button.
Do not touch the patient until defibrillation is complete.
|
|
|
7 The AED analyzes the ECG again after defibrillation.
8 Repeat steps 5–7 according to the AED voice prompts.
9 When defibrillation is no longer needed, the AED will instruct you to provide rescue breaths and chest compressions.
Provide rescue breaths and chest compressions with the electrode pads attached.
10 Even if the person’s pulse, breathing, and responsiveness return, leave the pads in place and keep the AED on until the ambulance arrives.
|
⑦Airway Open & Breathing & Circulation
* If you are waiting for an AED to arrive, stop the procedure below and use the AED as soon as it is available.
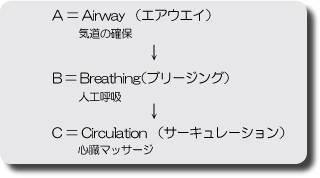
Keeping the airway open is called “A”irway open.
“B”reathing is blowing exhaled air into the lungs to deliver oxygen to the blood.
Exhaled air still contains about 16–18% oxygen after carbon dioxide is removed in the lungs.
This oxygen concentration can help sustain life, so it can be used for the patient during “B”reathing.
“C”irculation is compressing the stopped heart to move blood through the body.
Do not practice “C”irculation and “B”reathing on a healthy person. Use a dedicated training manikin for practice.
In rescue for drowning, “A”irway open and “B”reathing are the first priority. Remember “ABC.”
In contrast, for respiratory arrest due to heart disease, the priority is “CAB,” because “C”irculation comes first.
|
|
|
1 Place the person on their back on a firm surface or a board larger than the chest.
2 Kneel beside the person’s chest.
3 Remove dentures that could obstruct the airway and interfere with breathing.
It is not necessary to remove a full denture if it helps maintain the shape of the mouth during “B”reathing.
4 Using both thumbs, hold the pocket mask firmly against the person’s face and cover the nose and mouth.
The pocket mask is a compact mask that can be folded and carried in a pocket.
|
|
|
|
5 To open the airway, place both hands on the angles of the lower jaw and lift the jaw forward until the lower teeth move forward.
|
Pull the lower jaw forward
|
|
6 After opening the airway, give “B”reathing.
After you take a breath, blow into the patient for 1 second until the chest rises slowly and gently.
If you do not see the chest rise, check for air leakage between the pocket mask and the person’s face.
If you blow too quickly or too forcefully, air may enter the stomach.
The amount of air for an adult should be about 500 to 800 ml.
Stop blowing and watch the chest fall.
Repeat this ventilation 5 times continuously.
|
Make sure the chest is falling
|
|
7 After “breathing,” check chest and upper abdominal movement and confirm whether the person is breathing.
If the person starts breathing, place them in the recovery position and wait for an ambulance.
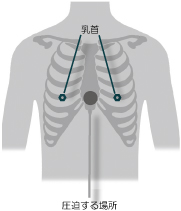
8 If the person does not start breathing, begin “C”irculation (chest compressions).
The correct hand position is the middle of the chest.
A guideline is on the line connecting the nipples.
|
|
|
9 Place the heel of one hand on the compression point, and place the other hand on top of the first hand.
Interlock your fingers and keep them off the chest so they do not press on the ribs.
|
|
|
10 Keep your elbows straight and press straight down using your upper body weight.
|
|
|
11 Compress at a rate of at least 100 times per minute and press the sternum down by at least 5 cm.
|
|
|
12 Give 30 compressions continuously.
Between compressions, keep your hands in contact with the chest but allow the chest to fully recoil.
The time spent compressing should be about the same as the time spent releasing.
|
|
13 If the person starts breathing, place them in the recovery position and wait for an ambulance.
14 If the person does not start breathing, give 2 breaths, then continue “B”reathing and “C”irculation by repeating steps 7 to 14.
After the initial 5 breaths (step 6), continue cycles of 30 compressions (“C”irculation) and 2 breaths (“B”reathing). Do not give up—continue until the ambulance arrives.
|
|
The ratio of “B”reathing to “C”irculation may differ from 30:2, but continue with confidence and do not stop.
If you are waiting for an AED to arrive, stop “B”reathing and “C”irculation and use the AED as soon as it is ready.
|
When there is only one rescuer
When there are two rescuers
|
|
To reduce the risk of lung injury, do not perform “B”reathing and “C”irculation at the same time.
Perform them alternately.
|
|
|
